
Contrary to other platforms, dev.to doesn’t have built-in support for Table of Contents (TOCs). Many articles describe tricks to generate TOCs, but those are often laborious and lack a clean UI.
I am thus proud to announce**✨✨** BitDownToc now supports dev.to ✨✨!

Also available as CLI and now with native executables! Check out the repo on GitHub for more info and leave a ⭐.
How to add TOCs to dev.to articles
Start by copying your article content. Then:
-
select the
dev.topreset, -
copy-paste your article into the left box,
-
click on
generate, -
click on
copy.
You now have your article content with TOC on your clipboard!
You can even redo the manipulation after an update to the article since BitDownToc is idempotent by default!
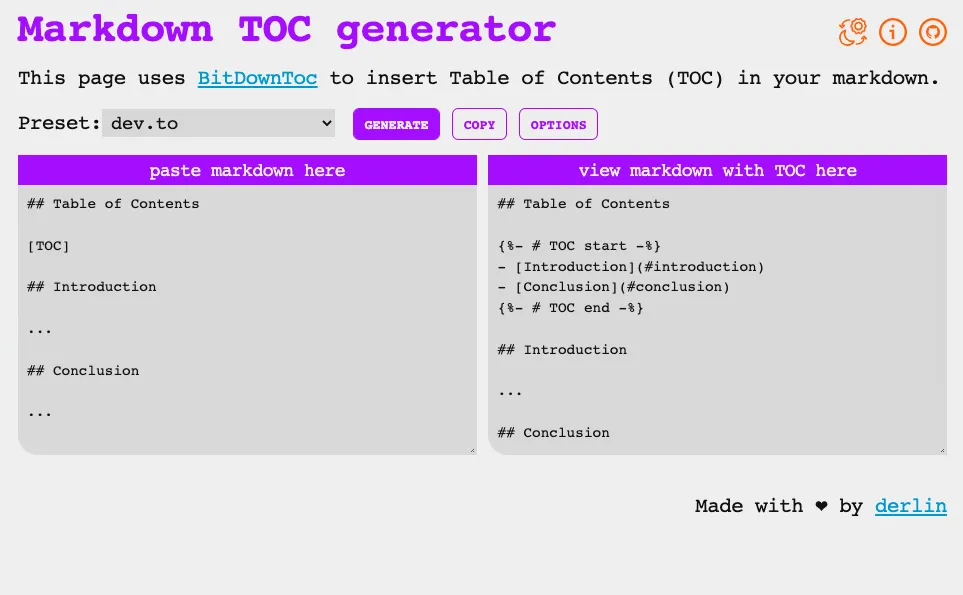
For the dark lovers out there, you can toggle the dark theme using the first icon on the top right 😉
↓ Table of Content (generated by BitDownToc) ↓
- Why are TOCs important?
- How do TOCs work?
- TOCs on dev.to
- Advantages of BitDownToc
- (Bonus) TOCs on other platforms
For hashnode, use the Gitlab profile and set anchors prefix to <sub>heading-</sub> in the options!
Why are TOCs important?
A table of contents (TOC) is important because it helps navigate the content and find specific information quickly. It allows readers to grasp in seconds what the article is about and to potentially jump to the section they are interested in in a click. It improves the overall organization, readability, and usability of the article.
How do TOCs work?
A table of contents is simply a list of fragment links (#xxx), with each link pointing to a section in the document - called an anchor.
Anchors are used to link to a specific location within the same webpage. Previous to HTML5, they were created using the <a> element and a name attribute, which is now deprecated in favor of the id attribute:
<!-- for old browser ... --->
<a name="section1">Section 1</a>
<!-- ... or for modern browser supporting HTML5 -->
<h2 id="section1">Section 1</h2>
To refer to an anchor, one can use a link with a # symbol - called a fragment link. From the example above:
<a href="#section1">Jump to Section 1</a>TOCs on dev.to
Dev.to automatically generates anchors for headings using the following algorithm:
-
take the heading text,
-
lowercase everything,
-
drop any character that isn’t a letter, a digit, or a space,
-
merge consecutive spaces into a single one
-
replace spaces with dashes.
To manually add a TOC to a dev.to article, we thus need to generate the TOC with the proper fragment links:
## Table of Contents
- [Introduction](#introduction)
- [This ;;; is Main.   Body](#this-is-main-body)
- [Conclusion  (yup)](#conclusion-yup)

## Introduction
...

## This ;;; is Main.   Body
...

## Conclusion  (yup)
...
...
This is tiresome to do… Hence BitDownToc!
Advantages of BitDownToc
There have been multiple solutions proposed to generate TOCs on dev.to articles in an “automatic” fashion, for example:
BitDownToc, however, offers more: idempotency and TOC placement (and a UI!).
An idempotent operation produces the same result no matter how many times it is applied. In other words, you can re-run BitDownToc on the same article multiple times: it will either update the TOC (if needed) or leave it as is.
To support this feature, TOC and anchors are preceded by/wrapped within small comments. Those comments are usually in HTML (<!-- ... -->), but since dev.to doesn’t support them (😦), the dev.to preset uses liquid tags instead (“).
The above example will look the same, but with liquid comments around the TOC:
...

- [Introduction](#introduction)
- [This ;;; is Main.   Body](#this-is-main-body)
- [Conclusion  (yup)](#conclusion-yup)

...
Another great feature of BitDownToc is the ability to control where the TOC will appear in the article using the marker [TOC]. Any heading above this marker won’t be part of the TOC.
Many more options are available! Toggle them by clicking on Options:
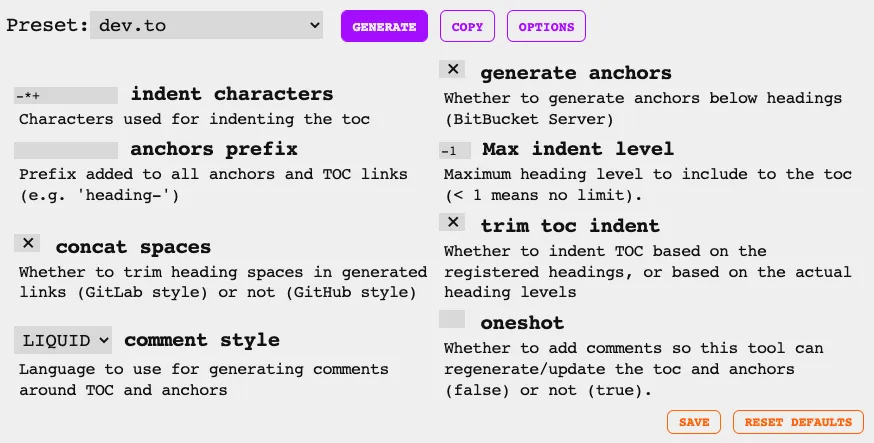
If you always use the same options, click on Save to make them the defaults 😉.
(Bonus) TOCs on other platforms
BitDownToc is meant to be universal. To make it easy to use, it comes with presets for most developer platforms such as GitHub, Gitlab, and BitBucket Server.
On GitHub, for example, the title is lowercased, all special characters (other than letters, digits, and spaces) in the heading are dropped, and spaces are replaced with dashes. Gitlab and dev.to merge consecutive spaces into a single one before performing the same logic. This option is called concat-spaces in BitDownToc. HashNode works like Gitlab, but prefixes anchors with heading-. This option is called anchors-prefix in BitDownToc.
For renderers that do not generate anchors (or if the anchor’s generation algorithm is too convoluted), BitDownToc can generate its own anchors directly in the markdown. This is what it does for BitBucket Server.
🗒️ Note that if you inspect the HTML of any README on GitHub or Gitlab, you won’t see the “real” anchors. A markdown like:
## IntroductionWill be translated to the following HTML snippet:
<h2 dir="auto">
  <a id="user-content-introduction"
     class="anchor" href="#introduction"
     aria-hidden="true"></a>
  Introduction
</h2>
This is because both platforms handle hash changes via Javascript, with a code that (probably) looks like this:
addEventListener('hashchange', () => {
  const hash = location.hash.toLowerCase();
  const elem = document.getElementById(`user-content-${hash}`);
  elem.scrollIntoView();
});
Find out more about BitDownToc on GitHub ⮕ https://github.com/derlin/bitdowntoc